It's HANGER, not "hangar"
My copy-editor friend Marc Nurre pointed out that I had used the spelling for an aircraft hangar throughout. Thanks Marc, I'm off to Vegas after work tonight. If I can find time, I'll go back through the posts and correct the mistake. (This is the specific piece of hardware in question: Simpson top-flange joist hangers )
(*Saturday night update ... I think I fixed all the "hangers")
Mark Yemma's step-by-step construction journal about creating a new upstairs room from unused vaulted ceiling space. Though designed to add value to the house as an extra bedroom, I mostly envision using the new space as a quiet, posh, sanctuary for reading and sipping tea with my English wife Anne.
Saturday, March 26, 2011
Tuesday, March 22, 2011
Installation of joist hangers
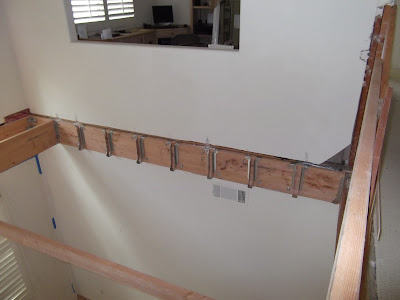
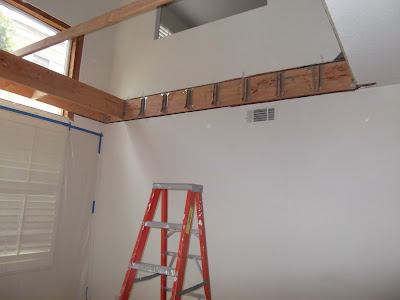
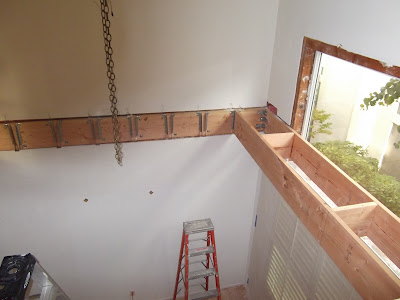
Once I bolted the perimeter beams to the walls, I penciled vertical lines every 16" to mark where each cross-joist would go. Then I nailed the Simpson top-flange hangers onto the beams. |
 |
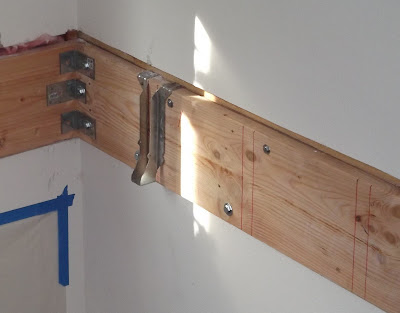
Close-up view of how the joists are attached: They slot into the metal hardware. I cut each joist slightly long so that they have to be jammed in tight using a sledge hammer on each end. |
 |
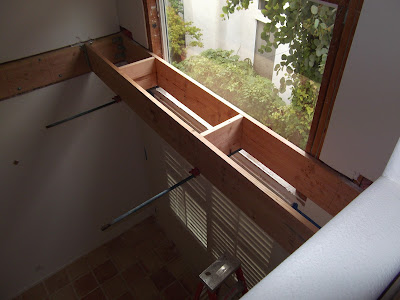
Installation of first joists, along with cross-blocking every 48 inches. (I will deal with the window removal and framing for a new, higher window once I have a new floor to stand on!) |
Despite my best efforts, nothing is quite perfect. Once into the project I discovered that the existing bridge is not quite level -- either a legacy of sloppy building by the Baldwin Brothers 20 years ago, or natural settling of the house. Most likely, it was sloppy framing to begin with. Further, the depth of the existing floor doesn't exactly match the dimensional depth of my new lumber. To match the new floor with the existing flooring on the bridge – and to match the drywall of the new dining room ceiling below with the existing drywall beneath the bridge – I am going to have to make some subtle adjustments. Essentially, I am going to have to slightly shave (saw) the height of each joist as I install it. I have already done the math, and the shaving will vary by about 1/32" increments with each joist. (This is where the project stands in the last full week of March, 2011. I try to get a little done each morning before I leave for work – even if it's just cutting one joist and hanging it.) |
Tuesday, March 15, 2011
Let the construction begin
A Sunday morning lumber delivery from Lowes (March 13.)
Beam bolted into existing wall using lag bolts. 2x12 joists will hang from Simpson Strong Tie top-flange joist hangers. (I had to special order these – neither Lowes nor Home Depot stocks these hangers in the size I needed.
Saturday, March 12, 2011
"And when you talk about destruction, don't you know that you can count me in"
Credit to John Lennon for that title . . . Using a 3 1/4" Makita cordless circular saw, I cut through the drywall and removed a strip approximately 13" tall around the perimeter of the room. My goal is to preserve as much of the existing drywall as possible.
I will bolt beams to the exposed wood framing and hang joists across the room from the beams.
The building inspector will want to see the floor structure before I top it with plywood, but I might place some temporary plywood onto it so I can set a ladder and do the upper-window framing before he comes out. (On the outside, I will build a scaffold.)
I began by sawing through the shutters and removing the top unit, which I hope to reuse in the new upper room. I removed part of the chandelier and as much of the drywall around the window as I could reach from a 10-foot stepladder. Once I've built the subfloor and can stand a ladder on it, I will strip off the rest of the drywall above the window – almost to the ceiling – so I can frame a new window opening.
I will bolt beams to the exposed wood framing and hang joists across the room from the beams.
The building inspector will want to see the floor structure before I top it with plywood, but I might place some temporary plywood onto it so I can set a ladder and do the upper-window framing before he comes out. (On the outside, I will build a scaffold.)
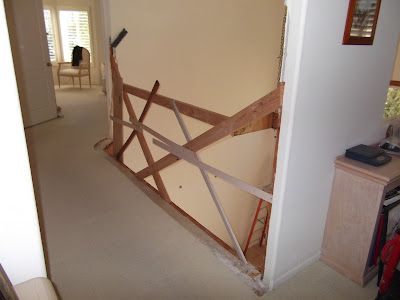
 |
| My jury-rigged temporary barrier (above & below). |
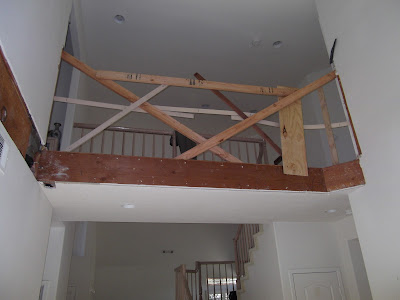 |
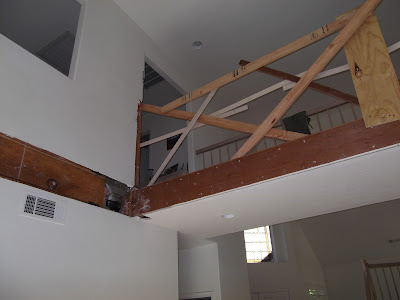
| Above & below: Upward-looking views of the bridge and temporary "railing" |
 |
| The deconstructed dining room (above), and a view of the room (below) before I started. |
| Later this year I hope to be sipping tea (or a martini) in this new upper room! |
Wednesday, March 9, 2011
A final stamp of approval
After three or four trips with my plans to the City of Lake Forest building inspector for consultations and tweaking, I finally received the stamp of approval to begin construction. But before they would even consider my project, the city wanted to see proof that my neighborhood homeowners association had no problem with the addition. (That was a relatively easy, affordable approval process that involved a few signatures from neighbors. I mean, who really cares that I'm moving a window higher up the wall? That's the only external modification to the house.)
The cool thing was that Tony looked over the structural plans and gave me some specific suggestions that would make my life easier -- along with keeping the inspectors happy.
The city permits cost me just under $800, but I feel I got my money's worth knowing that professionals had looked everything over and would eventually sign off on the finished project.
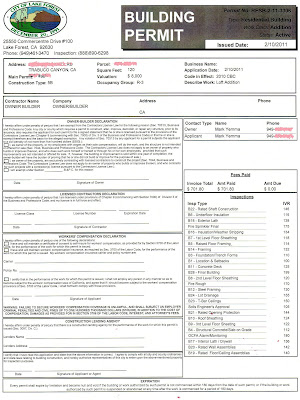
 In these copies of the actual permits I have airbrushed out my address and phone number. Why? Because only a few days after the permits became public record, I began receiving a barrage of phone calls from contractors and other tradesmen who wanted me to hire them. This, despite the fact that I have been on a do-not-call list for years. I not-so-politely told them to NOT phone me, that I don't do business that way.
 When I finally decide to give up my land-line, it will for this very reason: I hate phone solicitations.
I just can't say enough about how helpful the city workers were -- particularly the
plan-checking engineer Tony. Oh, to be sure he was a stickler. He made me add some features to conform with the current California Building Code. For example, I had planned to tie into existing electrical circuits, but the current code requires me to run an entirely new circuit and put it on an AFCI breaker ("arc fault circuit interrupter") to reduce the risk of fire. Plus, I have to include a carbon-monoxide detector. Having grown up in South Austin in a different era, I just rolled my eyes and laughed off the "nanny-state" requirements.
The cool thing was that Tony looked over the structural plans and gave me some specific suggestions that would make my life easier -- along with keeping the inspectors happy.
The city permits cost me just under $800, but I feel I got my money's worth knowing that professionals had looked everything over and would eventually sign off on the finished project.
(For that matter, I don't hire carpet cleaners, painters, air-duct cleaners, tree-trimmers, gardeners, handymen, or anyone else who cold-calls me at home. Why, in the year 2011, do small-business owners still think it's ok to intrude on folks' privacy and bother them with phone solicitations? It seems like an ineffective way to get business. And it makes me cranky.
At left, the electrical permit.
Below, the scope of the project (cover sheet of the plan-set).
Tuesday, March 8, 2011
Structural plan for the new floor
This diagram is the most crucial part of the plan -- and the one that the building inspector is most interested in.
In a nutshell, the plan calls for me to strip off drywall and bolt a 2x12 beam along each side wall. Then, I will attach Simpson Strong-tie Top-Flange Joist Hangers to these beams on 16" centers.
I will hang 2x12 joists (horizontal brown lines in diagram) from the hangers, with cross blocking every 48".
One hiccup in the plan: There is an HVAC duct in the existing wall -- I will have to give special treatment to that corner so that the beams and joists hang securely.
Once all the structural members of the subfloor are installed, I must get a "rough-framing inspection" from the Lake Forest building inspector -- then I can install the 3/4" CDX plywood subfloor over the joists and I will have a floor to walk on.
I got this bright idea over the weekend: Before I finish this floor, I want to get my son, Chris, over to help me lift heavy items like the french doors, plywood, 4'x8' sheets of drywall, etc. up through the floor. It'll be a lot easier than trying to carry that bulky stuff up the twisting staircase.
Saturday, March 5, 2011
A plan to save the shutters
The current 2-story dining room has lovely Elizabeth shutters covering both plate-glass windows. I aim to saw through the middle of the shutter unit so I can move the top part up into the new bedroom.
In the foreground is the bridge railing that must be removed. The new bedroom wall with french doors will go where this railing is. The opening in the wall from the office/loft to the dining room will be closed in.
At left, a view looking up. The existing wiring for the chandelier will have to be moved into the new dining-room ceiling.
As you can see, it will be much easier for me to deal with creating the new upstairs window on that high wall AFTER I build the new bedroom floor.
Thursday, March 3, 2011
Floor plan for the new bedroom
For visual aesthetics (as viewed from our "posh" living room), I will need to place the glass-paned french doors in the center of the new wall.
CLOSETS: For purposes of resale value, a bedroom isn't truly counted as a bedroom unless it has a closet.
Since the french doors will be centered, I will build two small closets on each side. I am not yet sure what type of closet doors I will use (possibly bifold doors), but I will choose them before I frame the closet walls.
I found an affordable pre-hung french door at my local Lowe's. It will require some careful painting, but even had I opted for a more-expensive pre-primed unit, I still would have to paint it in a final finish color. Here's the door I have ordered: Interior french door
The shaded right side of the drawing is an existing opening in the wall that allows us to look down from our office-loft into the dining room. It will be simple to close this up.
Wednesday, March 2, 2011
Starting with a month of paperwork
Submitting plans and obtaining clearances is the starting point for a project like this. Both the City of Lake Forest and my neighborhood homeowners association (Portola Hills II) required detailed plans.
I found that creating a custom-scale grid in Microsoft Excel worked just fine to craft the plans. I essentially turned Excel worksheets into "graph paper" -- with each little square equaling one square foot.
My starting point was scanning in a 20-year-old floor diagram given to me by a neighbor whose home is the mirror image of mine. This came from the builder's original sales brochure. I simply flipped the drawing electronically to match my house and began cleaning it up and labeling it for my purposes.
The new bedroom will occupy the central, rectangular space shown in the left image -- directly above the dining room.
Some difficult window work to come
In my estimation, one of the hardest tasks will involve removing this upper plate-glass window -- and installing a new, bedroom window approximately 6 feet higher.
On the outside, all the stucco surrounding this window -- and above it almost to the roof -- must be chipped away.
To meet California Building Code for bedroom egress, the new window must be a normal window that can be opened. Once the stucco is removed, I will frame-in the old opening and create a higher frame for the new 72" x 48" window.
To do all this work on the outside I plan to build wooden scaffolding. But before I even start on the outside, I will frame the new inside-floor so that I have relatively easy construction-access from both sides of the window openings.
The final step on the outside will be framing-in and stuccoing the opening left once this existing upper plate-glass window is removed.
Why add a bedroom?
In the 20th-anniversary year of moving into our Portola Hills home near Trabuco Canyon, CA, I have embarked on a do-it-yourself project to add another bedroom. As empty-nesters with 3 bedrooms and an office, we don't need the extra space, but I'm sure we'll find some nifty use for this 4th bedroom.
My reasons for pursing this are threefold: (1) It's a relatively easy project; (2) It should significantly boost the value of the house; and, (3) Construction is my hobby.
I construct two-dimensional newspaper pages for a living, but in my spare time I prefer to build three-dimensional projects.
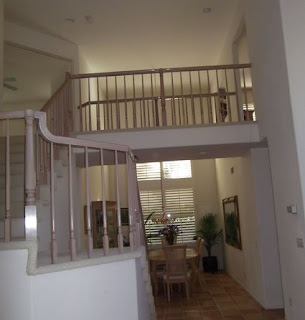
For years, I have considered enclosing the vaulted ceiling above the dining room -- behind the "bridge" in the photo, right.
When our child was young, the bridge was "cool," and I would not have been allowed to build a room behind it. More importantly, there were scores of other projects that came first.
When this project is done, you will still see the front railing of the bridge. What currently is the back railing will be a wall containing centered french doors with glass panes, small closets tucked behind each side, and a new upper-bedroom window -- with no view.
My reasons for pursing this are threefold: (1) It's a relatively easy project; (2) It should significantly boost the value of the house; and, (3) Construction is my hobby.
| The "bridge" over the dining room. |
For years, I have considered enclosing the vaulted ceiling above the dining room -- behind the "bridge" in the photo, right.
When our child was young, the bridge was "cool," and I would not have been allowed to build a room behind it. More importantly, there were scores of other projects that came first.
When this project is done, you will still see the front railing of the bridge. What currently is the back railing will be a wall containing centered french doors with glass panes, small closets tucked behind each side, and a new upper-bedroom window -- with no view.
Subscribe to:
Posts (Atom)
